I’ve got it posted everywhere else but here, so I feel bad. Figured I’d share 
Since I was a tard and destroyed my other worklog…
The condition it came in when we first picked it up was pretty narly. The rotors were rusted shut, brakes rusted shut in the back, ebrake stuck, no start on engine, interior was torn to bits, and it was infested with black widows. (yeah, i bug bombed it, unfortunately, and god that stuff stinks)
http://i225.photobucket.com/albums/dd58/koihoshi/porsche/cid_978.jpg
http://i225.photobucket.com/albums/dd58/koihoshi/porsche/0_IMAGE_201.jpg
Nasty.
http://i225.photobucket.com/albums/dd58/koihoshi/porsche/IMG_4366.jpg
gag
http://i225.photobucket.com/albums/dd58/koihoshi/porsche/IMG_4367.jpg
gotta love the moldy back seat.
http://i225.photobucket.com/albums/dd58/koihoshi/porsche/IMG_4372.jpg
So at first I was going to leave the seats. But after wanting to actually strip the interior and go full track car with a few cosmetics, I decided no on it. But here’s the seat resto anyway. Before and after…
http://i225.photobucket.com/albums/dd58/koihoshi/porsche/IMG_4374.jpg
After
http://i225.photobucket.com/albums/dd58/koihoshi/porsche/IMG_4379.jpg
doors before
http://i225.photobucket.com/albums/dd58/koihoshi/porsche/IMG_4382.jpg
doors after
http://i225.photobucket.com/albums/dd58/koihoshi/porsche/IMG_4384.jpg
ripping apart the console and tearing into the wiring
http://i225.photobucket.com/albums/dd58/koihoshi/porsche/IMG_4387.jpg
the lovely damage.
http://i225.photobucket.com/albums/dd58/koihoshi/porsche/IMG_4396.jpg
http://i225.photobucket.com/albums/dd58/koihoshi/porsche/IMG_4395.jpg
http://i225.photobucket.com/albums/dd58/koihoshi/porsche/IMG_4397.jpg
The dreaded engine bay…
http://i225.photobucket.com/albums/dd58/koihoshi/porsche/IMG_4393.jpg
Who the F*** would even try, right?
http://i225.photobucket.com/albums/dd58/koihoshi/porsche/IMG_4392.jpg
tasty fuel lines.
http://i225.photobucket.com/albums/dd58/koihoshi/porsche/IMG_4394.jpg
getting into the floorpan…
http://i225.photobucket.com/albums/dd58/koihoshi/porsche/IMG_4414.jpg
Assessing damage
http://i225.photobucket.com/albums/dd58/koihoshi/porsche/IMG_4419.jpg
Condition of everything else…
http://i225.photobucket.com/albums/dd58/koihoshi/porsche/IMG_4541.jpg
http://i225.photobucket.com/albums/dd58/koihoshi/porsche/IMG_4542.jpg
schweeeeeet
http://i225.photobucket.com/albums/dd58/koihoshi/porsche/IMG_4539.jpg
Scared yet?
http://i225.photobucket.com/albums/dd58/koihoshi/porsche/IMG_4550.jpg
Rip that shit out of there!
http://i225.photobucket.com/albums/dd58/koihoshi/porsche/IMG_4584.jpg
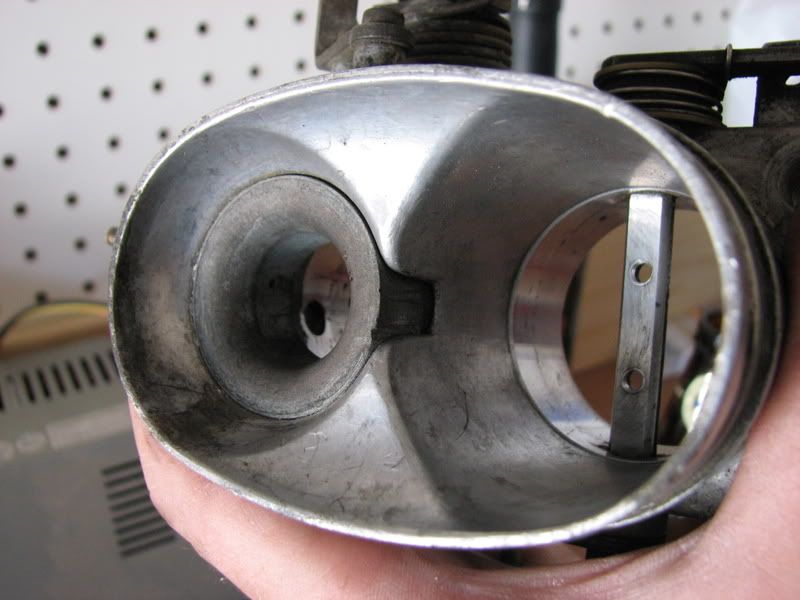
Clean up the throttle body…
http://i225.photobucket.com/albums/dd58/koihoshi/porsche/IMG_4589.jpg[/im]
Getting there…
[img]http://i225.photobucket.com/albums/dd58/koihoshi/porsche/IMG_4585.jpg
More dis-assembly…
http://i225.photobucket.com/albums/dd58/koihoshi/porsche/DSC_0125.jpg
Fixing the motor for the lights
http://i225.photobucket.com/albums/dd58/koihoshi/porsche/IMG_4611.jpg
Finding some original OEM goodies.
http://i225.photobucket.com/albums/dd58/koihoshi/porsche/IMG_4615.jpg
http://i225.photobucket.com/albums/dd58/koihoshi/porsche/DSC_0133.jpg
http://i225.photobucket.com/albums/dd58/koihoshi/porsche/DSC_01322.jpg
http://i225.photobucket.com/albums/dd58/koihoshi/porsche/DSC_0130.jpg
The complete transformation of the throttle body after a full clean, glassbead, a little polishing with a dremel, and repaint. (has since been pulled and polished more and also lubed since then too)
http://i225.photobucket.com/albums/dd58/koihoshi/porsche/IMG_4541.jpg
http://i225.photobucket.com/albums/dd58/koihoshi/porsche/IMG_4542.jpg
http://i225.photobucket.com/albums/dd58/koihoshi/porsche/IMG_4543.jpg
http://i225.photobucket.com/albums/dd58/koihoshi/porsche/IMG_4648.jpg
http://i225.photobucket.com/albums/dd58/koihoshi/porsche/IMG_4649.jpg
http://i225.photobucket.com/albums/dd58/koihoshi/porsche/IMG_4650.jpg
http://i225.photobucket.com/albums/dd58/koihoshi/porsche/IMG_4651.jpg
http://i225.photobucket.com/albums/dd58/koihoshi/porsche/IMG_4688.jpg
http://i225.photobucket.com/albums/dd58/koihoshi/porsche/IMG_4688.jpg
Finally…
http://i225.photobucket.com/albums/dd58/koihoshi/porsche/IMG_4701.jpg
Airbrush time
http://i225.photobucket.com/albums/dd58/koihoshi/porsche/DSC_0061.jpg
http://i225.photobucket.com/albums/dd58/koihoshi/porsche/DSC_0062.jpg
Pics of the engine bay progress…
Then
http://i225.photobucket.com/albums/dd58/koihoshi/porsche/IMG_4391.jpg
Little later
http://i225.photobucket.com/albums/dd58/koihoshi/porsche/IMG_4698.jpg
http://i225.photobucket.com/albums/dd58/koihoshi/porsche/IMG_4697.jpg
The first start. Keep in mind how shitty it sounds.
[url=http://www.youtube.com/watch?v=BaZodnrhDtk&feature=player_embedded]http://www.youtube.com/watch?v=BaZodnrh ... r_embedded[/url]Our first limp on the road to a gas station for the first time in 10 years.
http://i225.photobucket.com/albums/dd58/koihoshi/porsche/cid_612.jpg
Fixing the damn drum brakes.
http://i225.photobucket.com/albums/dd58/koihoshi/porsche/drums/IMG_4997copy.jpg
Gee wonder why they were stuck.
http://i225.photobucket.com/albums/dd58/koihoshi/porsche/drums/IMG_4998copy.jpg
Working on weight reduction. Remember before…
http://i225.photobucket.com/albums/dd58/koihoshi/porsche/IMG_4366.jpg
Ah fun times.
http://i225.photobucket.com/albums/dd58/koihoshi/porsche/IMG_4763.jpg
http://i225.photobucket.com/albums/dd58/koihoshi/porsche/IMG_4768.jpg
Closer…
http://i225.photobucket.com/albums/dd58/koihoshi/porsche/DSC_0315.jpg
And closer…
http://i225.photobucket.com/albums/dd58/koihoshi/porsche/DSC_0316.jpg
Get that shit out of there.
http://i225.photobucket.com/albums/dd58/koihoshi/porsche/DSC_0317.jpg
Ugh.
http://i225.photobucket.com/albums/dd58/koihoshi/porsche/IMG_4762.jpg/img]
Better.
[img]http://i225.photobucket.com/albums/dd58/koihoshi/porsche/DSC_0250.jpg
There we go…
http://i225.photobucket.com/albums/dd58/koihoshi/porsche/DSC_0251.jpg
While I was at it… old cable was shot. Wanted to open hood in the morning…
http://i225.photobucket.com/albums/dd58/koihoshi/porsche/DSC_0238.jpg
Old one was a bit of a miss.
http://i225.photobucket.com/albums/dd58/koihoshi/porsche/DSC_0253.jpg
Sealed trunk later and a new carpet mat later… (still need to grind down the rear parts up near the hatch and seal and paint those, but the actual trunk is finished)
http://i225.photobucket.com/albums/dd58/koihoshi/porsche/drums/IMG_5009.jpg
A newer video of it running a lot more smoothly
http://www.youtube.com/watch?v=E7ygVRL0W6YLast video i had uploaded after fixing a ton of vacuum leaks. Meant to say “most are vacuum line routing” not leaks on the working kinks out, but anyway…
http://www.youtube.com/watch?v=HTCxCv2YcF0You’ll also notice a lot more parts replaced. Lots of less rust in the engine bay in the last vid.
The engine will be rebuilt over the winter if all goes as planned, since the car was vandalized, i have little choice anyway.
And the day i took them out for fun…
http://i225.photobucket.com/albums/dd58/koihoshi/944/DSC_0666.jpg
http://i225.photobucket.com/albums/dd58/koihoshi/944/DSC_0665.jpg
PS: This is more of a cliffnotes sort of snapshot of it, since I actually have over 30 pages of worklogs on my website about it… lots of pics though on my photobucket with it… http://s225.photobucket.com/albums/dd58 … i/porsche/
parts car.
http://i225.photobucket.com/albums/dd58/koihoshi/porsche/3.jpg
http://i225.photobucket.com/albums/dd58/koihoshi/porsche/2.jpg
http://i225.photobucket.com/albums/dd58/koihoshi/porsche/1.jpg
The good news - got the engine running and turning over today. LOTS of parts on it are in insane condition. Before it was parked the engine apparently had been replaced on almost all of the CIS parts. Almost all of them are in immaculate condition. The fuel system was my biggest concern and I am IMPRESSED.
Tranny is great, torque tube is in awesome shape and the engine is better than I could expect. Mind you the rest looks like pure ass… this would have cost the same as my parts budget for a while, so I won’t complain since it was FREE!
My this car rest in pieces when I’m done parting it out. I feel bad that it lived such a great life to come to such an end, but this car would take a small army to get it back on the road… it will serve a great cause
Got bored today so i started working on the new gauges which were in wayyyy better shape. Was going to get to work on stripping some stuff out and getting to work on the dash.
However, I can’t find the strips of carbon fiber I had for it… so i worked on the gauges and getting them back in shape.
I salvaged the extra console i have and basically stripped it of the switches, gauges, etc, which I am going to reuse on a small, carbon fiber layered display once i’m finished. Because i’m finicky and picky, i decided to take them apart, clean them up, etc… tested them as well. Obviously there’s no point in using gauges if they don’t work, right? And that milky look you get when gauges are 20+ years old? Annoying, right?
Here’s the console itself.
http://i225.photobucket.com/albums/dd58/koihoshi/porsche/DSC_0075.jpg
Pulling the gauges.
http://i225.photobucket.com/albums/dd58/koihoshi/porsche/DSC_0077.jpg
Switches (tested each one, work great)
http://i225.photobucket.com/albums/dd58/koihoshi/porsche/DSC_0078.jpg
Process of testing and fixing gauges. First off… These are in WAY better shape than my last ones. They just need cleaned. On these particular gauges Porsche uses tools to essentially put a small metal cover over a rubber gasket that seals the back onto them. It’s a delicate process to try and take the cover off… not break the glass… and put it back on properly…
http://i225.photobucket.com/albums/dd58/koihoshi/porsche/DSC_0079.jpg
Cleaning up the exterior metal.
http://i225.photobucket.com/albums/dd58/koihoshi/porsche/DSC_0080.jpg
The back and contacts.
http://i225.photobucket.com/albums/dd58/koihoshi/porsche/DSC_0082.jpg
That milky look i was talking about.
http://i225.photobucket.com/albums/dd58/koihoshi/porsche/DSC_0083.jpg
First, test it and make sure it even reads voltage.
http://i225.photobucket.com/albums/dd58/koihoshi/porsche/DSC_0085.jpg
Sweet.
http://i225.photobucket.com/albums/dd58/koihoshi/porsche/DSC_0086.jpg
Taking the back off to clean the contacts and make sure 100% we are getting the best POSSIBLE connection at all times. Remember these contacts are from 1977!
http://i225.photobucket.com/albums/dd58/koihoshi/porsche/DSC_0087.jpg
Sand and clean these down, ensure the plugs are done well.
http://i225.photobucket.com/albums/dd58/koihoshi/porsche/DSC_0088.jpg
Looks bent, but corrects when putting back on. Delicate… remember…
http://i225.photobucket.com/albums/dd58/koihoshi/porsche/DSC_0089.jpg
Gasket.
http://i225.photobucket.com/albums/dd58/koihoshi/porsche/DSC_0090.jpg
If the inside is in good shape it’ll be nice and black, look clean and solid. Remove any contaminants inside the gauges…
http://i225.photobucket.com/albums/dd58/koihoshi/porsche/DSC_0091.jpg
Make sure you are happy with the glass before you put it back in. I gently blow on mine to remove any dust, and then use something soft to wipe it off. Put it back in the gauges and if there’s dust, blow it off and do it again. I touch it with a napkin so my fingerprints don’t get in it.
http://i225.photobucket.com/albums/dd58/koihoshi/porsche/DSC_0092.jpg
Sweet. There’s glass in there?
http://i225.photobucket.com/albums/dd58/koihoshi/porsche/DSC_0093.jpg
And done.
http://i225.photobucket.com/albums/dd58/koihoshi/porsche/DSC_0094.jpg
I also got bored and figured I’d see if the badge was also able to be fixed. Covered in some sort of awkward primer, paint, and house paint?
http://i225.photobucket.com/albums/dd58/koihoshi/porsche/DSC_0096.jpg
So i started wiping away… something is under there.
http://i225.photobucket.com/albums/dd58/koihoshi/porsche/DSC_0097.jpg
After a lot of using my own little tools and chems to get it down to where it needed…
http://i225.photobucket.com/albums/dd58/koihoshi/porsche/DSC_0098.jpg
Finally…
http://i225.photobucket.com/albums/dd58/koihoshi/porsche/DSC_0100.jpg
After a nice polish. Just needs a little hand polishing now…
http://i225.photobucket.com/albums/dd58/koihoshi/porsche/DSC_0103.jpg
Before and after. This goes on the car last. It’s not finished till the badge is on it
http://i225.photobucket.com/albums/dd58/koihoshi/porsche/badge.jpg
http://i225.photobucket.com/albums/dd58/koihoshi/porsche/2009-12-27160736.jpg
Prepping to pull the bastard.
http://i225.photobucket.com/albums/dd58/koihoshi/porsche/IMG_5703.jpg
Ugly, but not rusted, needs cleaned and runs great.
http://i225.photobucket.com/albums/dd58/koihoshi/porsche/IMG_5704.jpg
This windshield has aerodynamic A/C mods!
http://i225.photobucket.com/albums/dd58/koihoshi/porsche/IMG_5705.jpg
My buddy Kenny drinking his coffee with an elegant touch.
http://i225.photobucket.com/albums/dd58/koihoshi/porsche/IMG_5706.jpg
Cherrypicker time!
http://i225.photobucket.com/albums/dd58/koihoshi/porsche/IMG_5707.jpg
Me disconnecting the crossmember to get the engine out.
http://i225.photobucket.com/albums/dd58/koihoshi/porsche/IMG_5708.jpg
And…
http://i225.photobucket.com/albums/dd58/koihoshi/porsche/IMG_5709.jpg
YES
http://i225.photobucket.com/albums/dd58/koihoshi/porsche/IMG_5711.jpg
Finally it’s home.
http://i225.photobucket.com/albums/dd58/koihoshi/porsche/IMG_5712.jpg
http://i225.photobucket.com/albums/dd58/koihoshi/porsche/IMG_5713.jpg
Now the real work can start.
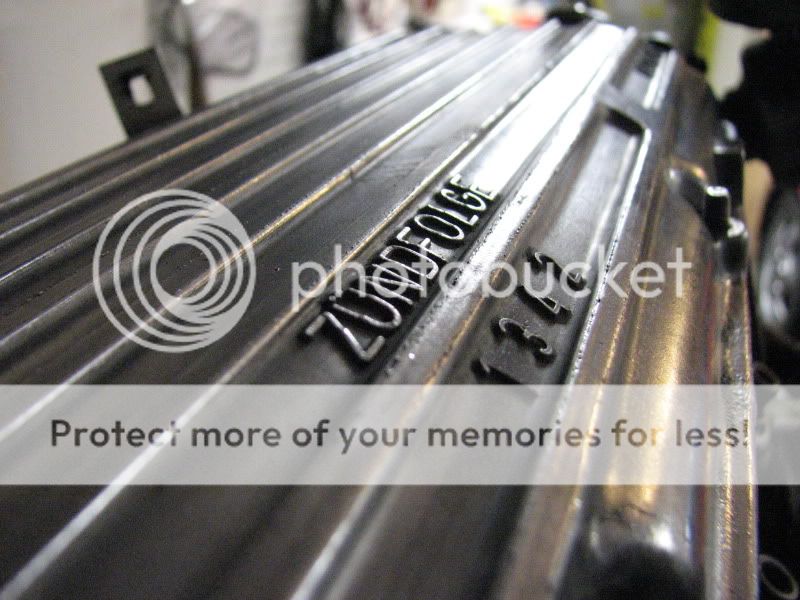
Yeah. I like to hand polish stuff first and see how it turns out. If I don’t like it I paint it. In this case, the original parts are starting to look pretty cool and are cleaning up nicely. Started cleaning the engine up quite a bit tonight.
Zündfolge! I love original parts.
Interestingly enough I found that this oil cooler fits the match for 924S and 924 Turbo parts. It’s essentially a 944 oil cooler mounted externally… The plumbing is all there. The more interesting thing is that all the mounts on the engine aren’t custom, it’s stock plumbing. Which means in essence that this late model 924 was actually an S model or that in fact this is 100% a euro spec engine… I still need to decipher all of the parts. But I found that interesting. The other possibility is that someone has taken different engines and build it into one which is another possibility, but if that’s the case then that means the bottom end is a late model engine and the rest is something else. Either way, it’s making me happy.
http://i225.photobucket.com/albums/dd58/koihoshi/porsche/IMG_5728.jpg
Cams look in great shape. Wear isn’t bad at all.
http://i225.photobucket.com/albums/dd58/koihoshi/porsche/IMG_5722.jpg
Definitely gonna get some head work done on the head.
http://i225.photobucket.com/albums/dd58/koihoshi/porsche/IMG_5720.jpg
Checking all of the exhaust manifold gaskets, there was a single thousandth of a mark off on the ends vs the middle. So no warping on these gaskets. Good sign that the the engine has been running as intended and not too lean on any of the cylinders. All of the cylinders were within 1 one thousandth.
http://i225.photobucket.com/albums/dd58/koihoshi/porsche/IMG_5727.jpg
Forgot to mention also…
Found the part numbers for the setup i want. here’s a picture of my friend’s 924 engine over in portland that he built. It’ll be essentially very very similar.
Just for motivation And also so people have an idea of what it’ll look like when it’s gone to megasquirt. Essentially all VW parts, but it’s mostly a VW engine. Yeehaw!
http://i148.photobucket.com/albums/s10/fiat22turbo/Porsche924/P9120002.jpg
http://i148.photobucket.com/albums/s10/fiat22turbo/Porsche924/P9120003.jpg
http://i148.photobucket.com/albums/s10/fiat22turbo/Porsche924/P9120001.jpg
Thank god for vacations. Most people go to another state. I go to my garage. With a nice week to myself, and motivation, I plan on getting a LOT done.
Some quick updates since pictures will come later and I’m taking a quick break…
- More weight reduction. Back seat removed. Passenger side coming along nicely.
- Unfortunately the “seal” to the hatch failed in a spot, leaking in water, I have more work to do.
- The “sealing” job for the floorpan failed. I am going to re-grind (again) and reseal (again) the floorpan, this time using the right shit. POR15. Then repaint and recover the floor plan in black. Mostly because I can, and I hate that unfinished primered look on floorpans.
- Tested the fitment of the racing seat to ensure it will fit correctly. Looks like I’ll need to get some custom brackets done. Luckily, my buddy who made the seat brackets in my 944 confirmed he can do so for the 944 as well, since I Have no welder or torch. Yessssss.
- Tested the placement of seat just to see how it sets. It’s a tight fit, but a comfy one once your in. Keyword… once you’re in… getting in and out is a bitch, but whatever, it’s going to be a trackday so I don’t give a shit.
- Removing the wiring and everything that goes to the heater. Since it’s a trackday car you guessed it, won’t need one! So prepping all of that.
- Working on the gauges some more.
- Working on the engine rebuild some more. Trying to figure out exactly how I want to do everything, also searching for part #s from my friend’s megasquirt build since i saw how he did his and like the setup and it’s simplicity. Part hunting time.
- Checking major parts of the frame and under the car for any serious rust damage that may compromise integrity. Thus far, it’s clear, a few surface rust spots, nothing major. Will be POR15’d in any spots I don’t like and painted over to ensure it stays that way.
More to come.
Alright so I pulled my seat out of my garage after it had been sitting a while. Didn’t really care about cleaning anything up, so everything is grody as hell but whatever.
The seat fits and does fit correctly. However… I ran into an issue.
Issue #1… the hatch apparently didn’t latch properly… Resulting in the floorpan having some issues with rust. Again. Thankfully it’s a small amount of surface rust. However, the other issue at hand now is that I found the sealing I did ended up NOT sealing it as well as I thought.
http://i225.photobucket.com/albums/dd58/koihoshi/porsche/IMG_5742.jpg
^^^ Stupid hatch leak.
Anyway, tomorrow I’m going at the WHOLE floorpan all over again with my wire wheel. Going to get it all the way back down to bare metal and reseal it with more layers and ensure this time it is finished and done, cleared, and triple uber super duper sealed from cancer.
Issue #2 is that the brackets ended up being just a hair shy on the brackets. Turns out the “universal 924/944” bracket isn’t so universal. As previously said, my friend is going to help me cut and weld and move the brackets or make new ones, no biggie.
The plus side is that regardless, I was able to bolt them down and see where the seat would set to. Tight fit, but, a comfortable one… but tight…
http://i225.photobucket.com/albums/dd58/koihoshi/porsche/IMG_5736.jpg
http://i225.photobucket.com/albums/dd58/koihoshi/porsche/IMG_5737.jpg
http://i225.photobucket.com/albums/dd58/koihoshi/porsche/IMG_5738.jpg
One small step back with the rust sealing, but move forward with more stripping, no back seat and more weight reduction. More and more progress.
More pics tomorrow I’m just too lazy to write a lot right now.
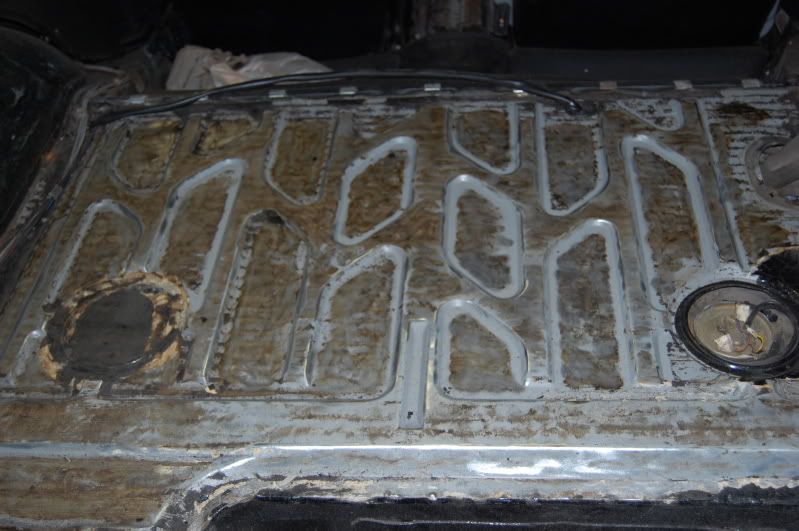
After taking the back seat out, I stumbled upon a LOT of rust. Tons of pitting. None made it’s way through just yet. I didn’t feel like taking pictures constantly through the entire process as it can be a bit cumbersome, and on top of it the cabin smelled of chemicals, prep clean, sealant, primer, etc… so really with having a paint mask on you just wanna get it done.
So anyway. :reading2:
I did want to get a picture of what it looks like when you take off sound deadening on an old car.
http://i225.photobucket.com/albums/dd58/koihoshi/porsche/DSC_0230.jpg
You will notice in the above picture that I left the sound deadening portion off and the glue STUCK on the middle portion, this is so you can see what lies beneath. Up towards the back where the seat was I cleared it off to the best of my abilities without chemicals.
Below is after chemicals.
http://i225.photobucket.com/albums/dd58/koihoshi/porsche/DSC_0231.jpg
As you can see in both pictures it’s clean. But you can see around the edges where the paint worn away that there are soft spots where moisture sat and ate away and got to it and it rusted.
As well… where the seats were provided a horrible spot for rust. Since the padding Porsche used was not the foam we use nowadays, but between a cardboard like substance that has the texture of fiberglass you’d lay inside your walls, it felt like that, but very absorbent. The entire lining in the cabin area with anything that was laid down with the stuff is moist and will need ripped out.
Positive side… got to use my new powertools my dad got me for Christmas.
Again, didn’t feel like posting the entire process. So here is while I was taking out the soft spots and getting down to the metal.
http://i225.photobucket.com/albums/dd58/koihoshi/porsche/DSC_0232.jpg
http://i225.photobucket.com/albums/dd58/koihoshi/porsche/DSC_0233.jpg
http://i225.photobucket.com/albums/dd58/koihoshi/porsche/DSC_0234.jpg
http://i225.photobucket.com/albums/dd58/koihoshi/porsche/DSC_0235-1.jpg
http://i225.photobucket.com/albums/dd58/koihoshi/porsche/DSC_0235-1.jpg
Since the window was the best to see the result halfway finished… here it is through a few coats.
http://i225.photobucket.com/albums/dd58/koihoshi/porsche/DSC_0238-1.jpg
Will sand down any more soft spots again tomorrow and lay down a few more coats to fully seal it. Mean while I will also seal the trunk. It actually HAS NOT RUSTED through the sealing coat I put through it, but to be sure I’ll inspect and seal as necessary.
Keep it up Derek. Doing a great job buddy
Alright, working a bit on the engine today.
This one has a blown head gasket too. It did start and sputter and run like ass when we tested it, now it makes sense why it wouldn’t stay running. Thankfully my dad has a lot of tools in his shop so I am going to take it in and get it honed and measure it, new rings, clean it up, do some head work and get this puppy back on track.
Sign #1 something is wrong when you lay the intake manifold down and this shit falls out.
http://i225.photobucket.com/albums/dd58/koihoshi/porsche/enginerebuild/IMG_5747.jpg
http://i225.photobucket.com/albums/dd58/koihoshi/porsche/enginerebuild/IMG_5748.jpg
Valve tappets are in great shape. So is the cam. Don’t mind the dirt on the top, it’s from taking the distributor off the engine.
http://i225.photobucket.com/albums/dd58/koihoshi/porsche/enginerebuild/IMG_5749.jpg
http://i225.photobucket.com/albums/dd58/koihoshi/porsche/enginerebuild/IMG_5750.jpg
http://i225.photobucket.com/albums/dd58/koihoshi/porsche/enginerebuild/IMG_5751.jpg
http://i225.photobucket.com/albums/dd58/koihoshi/porsche/enginerebuild/IMG_5752.jpg
This is when I went “Ugh.”
http://i225.photobucket.com/albums/dd58/koihoshi/porsche/enginerebuild/IMG_5753.jpg
http://i225.photobucket.com/albums/dd58/koihoshi/porsche/enginerebuild/IMG_5754.jpg
Reason for the failure. If you can’t see why, well… we need to have a talk.
http://i225.photobucket.com/albums/dd58/koihoshi/porsche/enginerebuild/IMG_5755.jpg
http://i225.photobucket.com/albums/dd58/koihoshi/porsche/enginerebuild/IMG_5756.jpg
Gonna go tear the bottom half off now. More pics later.
Holy wowzers batman how long ago did the head gasket let looose?
probably before the car sat.
I haven’t updated this in a while, here’s progress!
All the way down to the block. Next stop - Hot tank, hone, and machine work.
http://i225.photobucket.com/albums/dd58/koihoshi/porsche/DSC_0150.jpg
Pictures of cylinders. Not that bad. Will need honed.
http://i225.photobucket.com/albums/dd58/koihoshi/porsche/DSC_0149.jpg
http://i225.photobucket.com/albums/dd58/koihoshi/porsche/DSC_0148.jpg
http://i225.photobucket.com/albums/dd58/koihoshi/porsche/DSC_0147.jpg
http://i225.photobucket.com/albums/dd58/koihoshi/porsche/DSC_0146.jpg
Perspective from the bottom end
http://i225.photobucket.com/albums/dd58/koihoshi/porsche/DSC_0144.jpg
http://i225.photobucket.com/albums/dd58/koihoshi/porsche/DSC_0143.jpg
http://i225.photobucket.com/albums/dd58/koihoshi/porsche/DSC_0142.jpg
http://i225.photobucket.com/albums/dd58/koihoshi/porsche/DSC_0141.jpg
Crank is in very good shape.
http://i225.photobucket.com/albums/dd58/koihoshi/porsche/DSC_0140.jpg
http://i225.photobucket.com/albums/dd58/koihoshi/porsche/DSC_0139.jpg
http://i225.photobucket.com/albums/dd58/koihoshi/porsche/DSC_0138.jpg
This had me going “huh…” as it has some oddball wear. Doesn’t look rotational since it goes back and forth diagonally, perhaps factory? Odd.
http://i225.photobucket.com/albums/dd58/koihoshi/porsche/DSC_0137.jpg
http://i225.photobucket.com/albums/dd58/koihoshi/porsche/DSC_0136.jpg
http://i225.photobucket.com/albums/dd58/koihoshi/porsche/DSC_0135.jpg
Yep. Ick.
http://i225.photobucket.com/albums/dd58/koihoshi/porsche/DSC_0134.jpg
http://i225.photobucket.com/albums/dd58/koihoshi/porsche/DSC_0133-1.jpg
http://i225.photobucket.com/albums/dd58/koihoshi/porsche/DSC_0132.jpg
Another of the odd wear.
http://i225.photobucket.com/albums/dd58/koihoshi/porsche/DSC_0131.jpg
I think the pistons could be cleaned up and reused but I think I may wanna just get new ones since I’m already getting new rods.
http://i225.photobucket.com/albums/dd58/koihoshi/porsche/DSC_0130-1.jpg
http://i225.photobucket.com/albums/dd58/koihoshi/porsche/DSC_0129.jpg
http://i225.photobucket.com/albums/dd58/koihoshi/porsche/DSC_0128-1.jpg
http://i225.photobucket.com/albums/dd58/koihoshi/porsche/DSC_0151.jpg
w00t.
http://i225.photobucket.com/albums/dd58/koihoshi/porsche/2010-05-13231139.jpg
http://i225.photobucket.com/albums/dd58/koihoshi/porsche/2010-05-13231231.jpg
http://i225.photobucket.com/albums/dd58/koihoshi/porsche/2010-05-13231246.jpg
http://i225.photobucket.com/albums/dd58/koihoshi/porsche/2010-05-13231302.jpg
Today I got the block hot-tanked. Got it back home, went after it with grinders, wire wheels, sandbits, you name it. Wiped it down in lacquer thinner to get all the impurities out and painted it. Still just doing one side at a time, but I finally decided my color combination I want for the car, I’m painting the engine to match
Here’s what I started with.
http://i225.photobucket.com/albums/dd58/koihoshi/porsche/DSC_0150.jpg
Hot tank
http://i225.photobucket.com/albums/dd58/koihoshi/porsche/enginerebuild/DSC_0250.jpg
More prep
http://i225.photobucket.com/albums/dd58/koihoshi/porsche/enginerebuild/DSC_0251.jpg
And more prep
http://i225.photobucket.com/albums/dd58/koihoshi/porsche/enginerebuild/DSC_0252.jpg
I didn’t get any pictures of the total prep, was too excited. But here’s one side finished.
http://i225.photobucket.com/albums/dd58/koihoshi/porsche/enginerebuild/DSC_0258.jpg
http://i225.photobucket.com/albums/dd58/koihoshi/porsche/enginerebuild/DSC_0253.jpg
http://i225.photobucket.com/albums/dd58/koihoshi/porsche/enginerebuild/DSC_0255.jpg
Lots of wire wheeling, grinding, more grinding, more wire wheeling, and even pulled out the hand grinder. So mix of dremel, hand sanding and a grinder. Lots of lacquer thinner to get the rusty dust off and that’s the end result.
Gonna go finish the rest here in a bit but am way tired, long day.
Here is today’s post of the interior stripping. I have not shared a lot of these photos since I wanted to post them when I was close to done since it’s pointless to go “HEY LOOK! RUST AND GROUND DOWN METAL!”
Since I like before and after photos.
http://i225.photobucket.com/albums/dd58/koihoshi/porsche/DSC_0230.jpg
http://i225.photobucket.com/albums/dd58/koihoshi/porsche/DSC_0233.jpg
http://i225.photobucket.com/albums/dd58/koihoshi/porsche/DSC_0237.jpg
http://i225.photobucket.com/albums/dd58/koihoshi/porsche/DSC_0238-1.jpg
Yay, so much fun.
http://i225.photobucket.com/albums/dd58/koihoshi/porsche/IMG_4759.jpg
Chisels, screwdrivers, hammer and armstrong.
http://i225.photobucket.com/albums/dd58/koihoshi/porsche/IMG_4763.jpg
http://i225.photobucket.com/albums/dd58/koihoshi/porsche/DSC_0249.jpg
http://i225.photobucket.com/albums/dd58/koihoshi/porsche/DSC_0251.jpg
These last 3 are the most recent.
http://i225.photobucket.com/albums/dd58/koihoshi/porsche/interiorstrip/DSC_0371.jpg
http://i225.photobucket.com/albums/dd58/koihoshi/porsche/interiorstrip/DSC_0370.jpg
As you can see if you look close, driver side still needs a bit more. And it’s dirty as hell in there so it’s easy to see all the dusty crud flying around thanks to me grinding in the car. But you get the idea.
http://i225.photobucket.com/albums/dd58/koihoshi/porsche/interiorstrip/DSC_0373.jpg
As of today there is no more carpet/material/lining/foam/trim in the car. It’s all gone now. I have dremeled/sanded/grinded/wheeled away almost all the cancer on the inside at this point and am sealing it.
It got crappy as hell outside so i parked it for today. But I took the rear quarters out and traced them so I can finish my lexan windows and took the pillars out so I can finally put to use the CF I bought. Going to probably buy some flat media CF so I can use it for the dash and gauges and then strip out the rest of the dash.
http://i225.photobucket.com/albums/dd58/koihoshi/porsche/interiorstrip/PART_1283295212601.jpg